Menu

Show posts

This section allows you to view all posts made by this member. Note that you can only see posts made in areas you currently have access to.

Show posts Menu

Topics - RailroadKits

#21
We recorded a quick little update yesterday while we were talking. Have a listen...

Streaming... http://www.modelrailroadexpo.com/Podcast/play.m3u

Direct Download... http://www.modelrailroadexpo.com/Podcast/1_15_15.mp3

Zipped file...  http://www.modelrailroadexpo.com/Podcast/1_15_15.zip

Thanks! Jimmy

#23
One of the many new clinicians for The 2015 EXPO is Lance Mindheim. Doug Foscale has been asking Lance to come to the show since the days of CSS. There was always a conflict for Lance. Until now...

Lance offers a new approach to modeling. Something that is brand new to The EXPO. In his first Platinum Workshop, Using Digital Photos for Model Surfaces (Thursday 11a - 1.30P) Lance will show you how he uses photographs to color his structures, rather than paints. Photos and materials will be provided so that participants can experiment with doors, windows, containers, etc...


In his second Platinum Workshop, Scratch building Utility Poles and Line Side Details, (Thursday 2.30P - 5P) emphasis will be placed on thin/prototypically correct cross sections and materials to create realistic utility poles, fiber optic markers, line side signs etc.  Materials will be provided so that participants can take home the finished products they'll build in this workshop.


Lance is a well known model railroad author and has been published in all our favorite hobby magazines. His scenes are extremely realistic and most times you have to look twice to be sure that what your looking at isn't a photograph of the real thing!

Lance only has a few spots left in his Platinum Workshops. Reserve your place today HERE.

#24
Only the most awesome list of Platinum Workshops Ever!
NOW OPEN FOR ADVANCED RESERVATIONS!

PREMIUM PLATINUM WORKSHOPS LIST SCHEDULE IS HERE

P1. No Guru, No Message: Techniques You Haven't Tried. Bob Mitchell  Thursday 8a-10:30a

P2. Structure Lighting with LEDs. Bill SartoreThursday 8a-10:30a

P3. Using Digital Photos for Model Surfaces. Lance MindheimThursday 11a-1:30P

P4. Carving Realistic Stonework the New England Brownstone Way. Russ GreeneThursday 11a-1:30p

P5. Scratch building Utility Poles and Line Side Details. Lance MindheimThursday 2:30p-5:00p

P6. More Techniques w/ Pan Pastels. Roger MalinowskiThursday 2:30p-5:00p

P7. Build A Mini-Kit the Sierra West Way. Brett GallantThursday 6:00p-8:30p

P8. Build a small truss bridge from beginning to end. Maureen and Rick HunterThursday 6:00p-10p

P9. Mastering Static Grass - Jimmy Elster (Scenic Express)  Friday 8:00a-10:30a

P10. Scratch Building Boats Using Card Stock. Jon Addison  Friday 11:00a-1:30p

P11. Bring Life to Your Figures. Dave ReveliaFriday 2:30p-5:00p

P12. Get Wet. A Resin Water Clinic. Bill Obenauf.   Friday 6:00p-8:30p

P13. Hydrocal kits don't bite, really, they don't. Randy PepprockSaturday 8:00a-10:30a
#25
The EXPO Steams into Scranton PA / October News...
October 10, 2014, 01:48:02 PM
http://www.modelrailroadexpo.com/1015.html

If you didn't get a notice in your email, please be sure you are subscribed to the newsletter...
http://www.modelrailroadexpo.com/lists

Thanks!

Carry on...
#26
The location is one thing. The list of clinicians and their topics is another...

http://www.modelrailroadexpo.com/clinics.html

Many more to be added in the next week or so...

Jimmy
#28
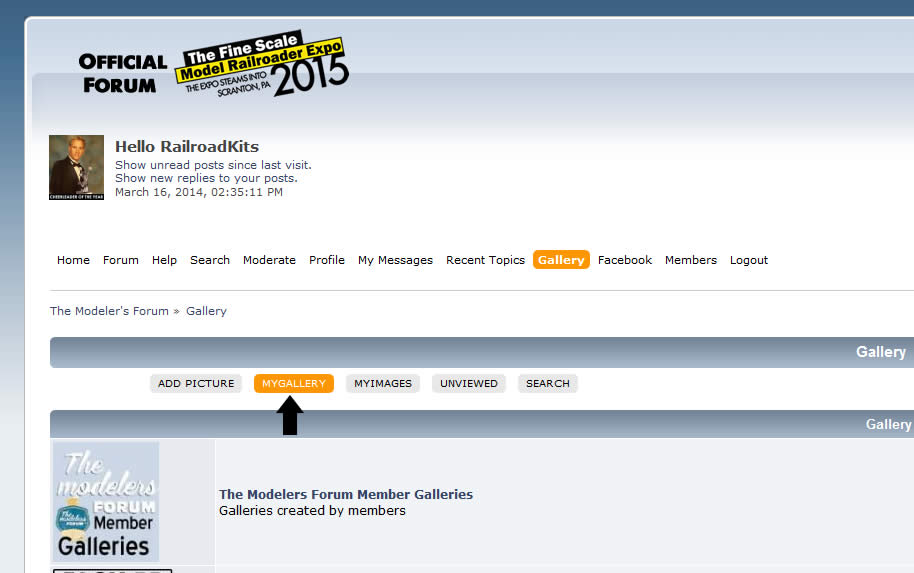
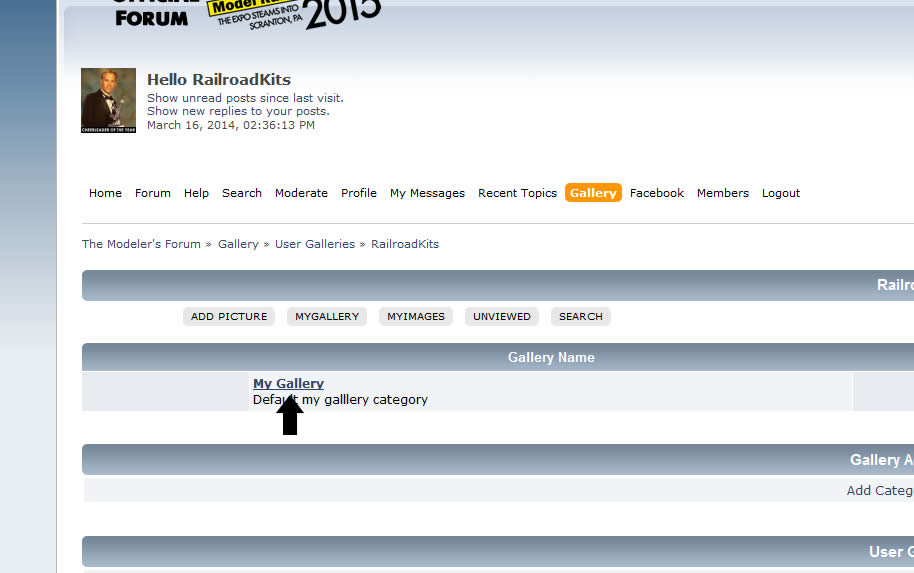
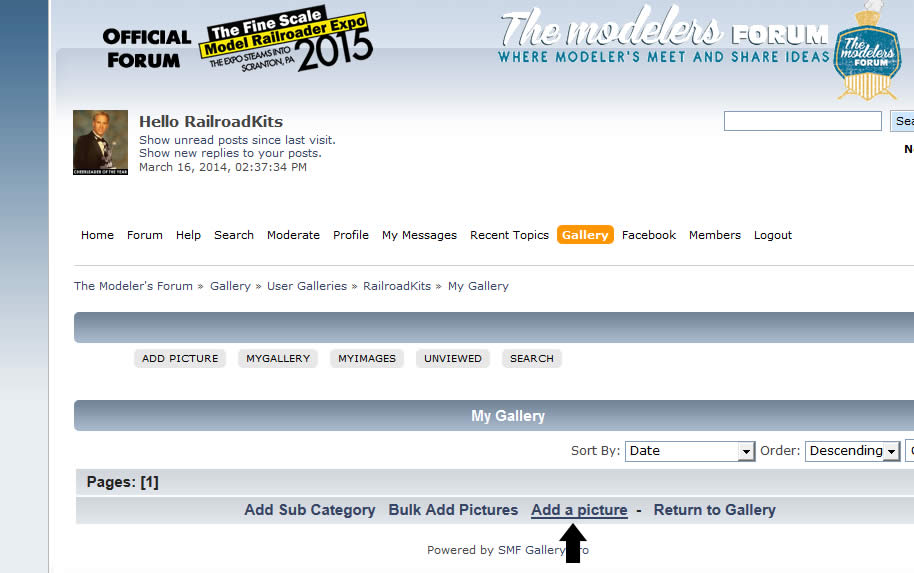
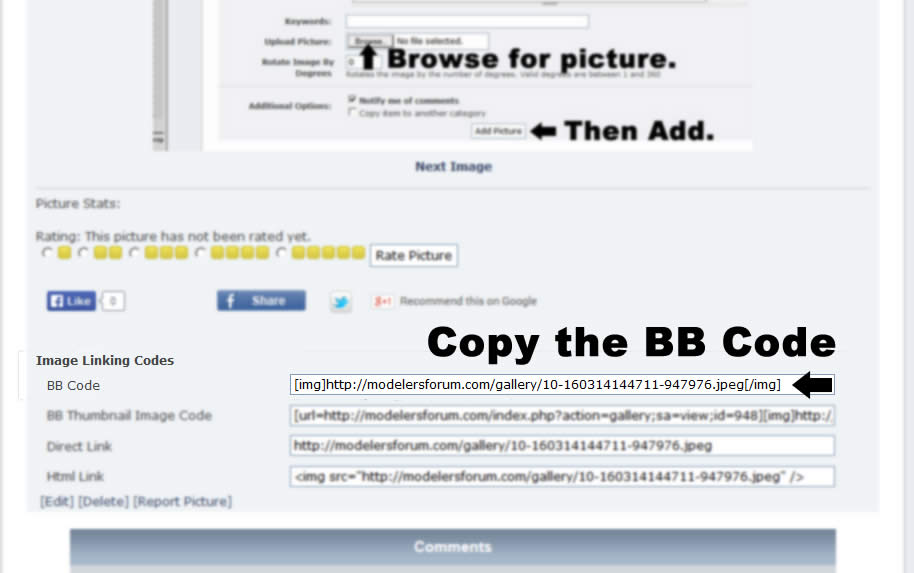
In Lesson 2 we'll show you how to use the Gallery to post your images "inline"

I keep two windows open in my browser, and jump back-and-forth between them.

Step One. Access your gallery:


Everyone here on the Modelers Forum has a gallery.


It's called "MYGALLERY" !!!


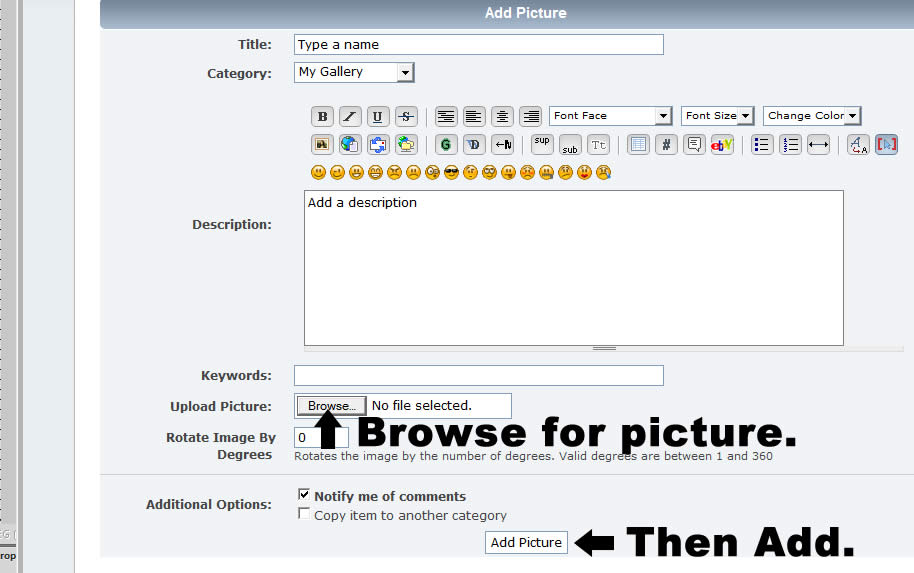
Add a picture to your gallery:


View the picture you uploaded. Then, copy the IMG tag BB Code. Paste the code where you'd like that photo to appear in your post:


JimmyD
#29
Image 1 goes here:

[attach=1]

Then I'll put image 2 here:

[attach=2]

That's it!

JimmyD

#30
Dioramas / Rollin Saywer by Fine Scale Miniatures
February 16, 2014, 04:09:46 PM
I got this diorama from Carl Laskey.
#31
eBay Crazies / Low Low Low Prices! Bid Bid Bid Now!
February 07, 2014, 08:49:11 AM
This diorama is worth 10 times this price! It is amazing! Built by the great Carl Laskey.

Check it out

Lot's of other great stuff listed like an Execution Rocks kit and an unopened JJ Hollender's both at NO RESERVE!

Jimmy
#32
Dioramas / Module Notes & Building Dioramas
January 01, 2014, 08:13:45 AM
I received this email and thought I'd pass it along. Jimmy

Hello and Happy New Year to everyone.

I had a chance to put some notes together for the module idea. They are rough and would benefit from others having people comment on them. When polished up they could be the notes for people want to try building one.

There's also an additional idea to get people building, the suggestion for them to scratch build an O scale shed and bring it along.

Regards,

Marc Seybold

Why 30x19 inches?  It is based on the golden ratio well known to architects and is found in many natural structures.  The ancient Greeks used the ratio to build many of their monuments. Things that use the ratio are particularly pleasing to the eye. The next size that would be interesting to MR is 36x22, we picked 30x19 so that it would be light, easy to fit in a car and is a small enough artistic canvas to not require overwhelming effort to create something. Think about using gator foam as the base, it is probably the lightest rigid waterproof material available.

To convince yourself that 30x19 is the way to go, head down to the home improvement store, pick out the lightest available piece of 2x4ft sheet material and have one piece cut to 30x19 and a second cut to 36x22. Practice walking around with them, getting them into cars, through doors. Now imagine them with scenery, track, structures.

Why two layers of rigid pink foam on top of the base? It increases options. It lets people model an estuary with a low trestle running across water. It lets the track run along the bottom of a mountain, with a stream or river at the base. It allows the front of the diorama to slope low toward the rear. It makes complex topographies that flow along diaganals possible. It allows for underground structures, everything from subways to parking garages. Remember that while only one track will be "active" it doesn't mean there can't be more as part of the scenic whole.

Think a convex mountain curving around the straight track with a river in between. How about a concave mountain curve with the river disappearing in both directions into s canyons hiding the ends of the river from view. What about converging rivers on a diagonal , think a Y with the long arm of the Y at a diagonal to the track.  Lay an S on top of the straight track and curve the scenery around the track. A waterfall with a railroad bridge spanning the river.  Taking artistic license,  famous railway bridges even if the bridge deck to water height is not prototypical, New York's Hellgate bridge anyone?

Other ideas could be industrial, a power plant, oil refinery, factories, train maintenance facilities, marina, cargo terminal,  city scape, towns, rural settings, mines, logging mills, subway stations, suburban commuter stations, super detailed electrified rail section, let your imagination go. Flat plains through wheat fields. Don't forget seasons as variety and of course time. Any era can be modeled. If you have children or grand children think about building a second module for them that is more whimsical. Something from fairy tales or fantasy or even science fiction. These will be grouped together under "Once upon a time" and give the children something to look forward to.

Before we get into tips & tricks, some words of encouragement.  Many more people attend shows and expos then bring a module or enter a competition.  We'd like to see everyone bring something so that we all learn from each others efforts.  Talk to many attendees and the most common explanation is doubt and lack of time. People are afraid they will spend a lot of time and effort,  to say nothing of money and have something that while not cringe inducing, is less than show worthy.

We're going to overcome all of those. Practice and experimentation are the key to good results and we're not going to start that on $100+ craftsmen kits. Pick out two or three $10 to $15 wood structure kits from different manufactures.  No one is going to get upset when that $10 kit doesn't turn out perfect. The second kit will be a lot better, we all make different mistakes the second time around! The third kit we're going to admit isn't half bad and the one we build after that will be darn good.

To practice structure painting and weathering take the low cost approach even lower. Buy some sheet stock, both plastic and wood of the same type as your model's.  Start practicing brush and color techniques on cardboard. When the cardboard starts looking good practice on the sheet stock. When that starts looking good we have one last confidence building trick.

Pick up enough scale lumber to build a board on board freelance O scale shed, 10 x 20 scale feet with at least one door and window. Build everything, walls, windows, doors, roof from scratch. Bring it to the show and we will have a special spot just for this collection where people can trade lessons learned. Why O scale? Assembly tolerences are more forgiving than at smaller scales, texture shows very well, the various finishing techniques are easier to learn at large scales, and when she said size doesn't matter she was lying.

Now, start building the low cost kits. After the Eureka moment as those kits come out way better than expected, don't stop. Go ahead and pull out one of your craftsmen kits and build it.

The key to progressing, is to fail forward and fail quickly. Plenty of low risk tries in a reasonable amount of time without so many steps we forget what worked and what didn't and why. We've gone over the general outline for getting the ball rolling.

If there are only enough funds to buy one dvd to get things going,  than Troels is the one. If there is room for two, the panpastels tutorial would be the second. Between the two, everyone will find something that works for them. Take the gentle approach of practicing on low cost materials to build confidence.  The results will be magical.

What follows are tips and tricks gleaned from the last two expos.  These include not just ideas from the session presenters but audience experiences as well.  Please note that materials preferences change frequently.  If something that works for you isn't here come to the Expo and tell the rest of us!

Always read product safety notes and follow safety guidelines including eye protection and breathing masks. Better to be safe than sorry.

Marc Seybold
#33
eBay Crazies / Just 99 cents!
December 21, 2013, 05:56:30 PM
[ebay]161180488987[/ebay]

#34
eBay Crazies / Crazy?
December 20, 2013, 07:26:05 AM
The kit isn't worth much more than this???

[ebay]191001152142[/ebay]

Yup. Crazy.
#35
1. Posting on Modelers Forum / Photo's "Inline"
December 19, 2013, 10:51:09 AM
I found this on Google:

Quick guide for using "Link Inline Image" when posting a topic

example:
you are going to post an article and you have 3 photos to go with it, but you want to place the photos at specific points in the text.

after typing the text, in desired order of display, browse for the photos you want to attach.

next place the code where you want each attachment to display in the text.

[attach=#]

where # is replaced by the order number of the attachment - i.e 1, 2, 3   etc

first image attachment to go here (where # = 1) [attach=1]

then the 2nd image (where # = 2) [attach=2]

and then the 3rd image (where # = 3) [attach=3]

Also note; images won't display until post is saved, once saved you can "modify" the post if you need to 'fine tune' attachment position. Image thumbnails are displayed in the post, but if you click the image, then a larger version appears.
#36
1. Posting on Modelers Forum / Register Using Facebook.
December 15, 2013, 10:54:25 AM
I noticed that if you click the "Facebook" icon to sign in or register, you may get an error the first time depending on your browser settings. If you go back and try it again, it appears to work.

Jimmy
Powered by EzPortal