Menu

Show posts

This section allows you to view all posts made by this member. Note that you can only see posts made in areas you currently have access to.

Show posts Menu

Messages - Random

#1
Dioramas / Re: Two cities layout.
January 26, 2022, 09:36:43 PM
I started a new job a while back.  Haven't been in the shop in a while.   That said, something is up...


#2
Dioramas / Re: Two cities layout.
April 08, 2021, 10:59:58 AM
This set of background structures is almost complete.


The brown building houses The White Rabbit Tavern, one of the oldest taverns in town, on the ground floor and apartments above.   The Red building is the home of Ieveli's Restaurant on the ground floor and apartments above.  It also sports a brand new awning. Pasquale, the owner, is very pleased.  Opened in 1924, it is the oldest Italian restaurant in the city.


The building on the right is the Merchants Co-operative Bank complete with a small cantilevered awning over the entrance and security bars inside the windows.


Here is a view down the block.


This block will sit behind the station scene.  I have one more false back structure to add.

Cheers
#3
Dioramas / Re: Two cities layout.
April 04, 2021, 11:53:00 AM
Window castings are easy once I stopped painting them with a brush.  The bank building's windows are cast in rows so I installed them after painting the castings and the walls.   The other 3 buildings have windows cast in place.  I spray the wall casting with the color I want for the windows and then brush paint the bricks. 

Cheers.
#4
Dioramas / Re: Two cities layout.
April 02, 2021, 11:20:32 AM
I finished weathering and roof details on the three new structures. 


I still need to add some signs and looking at the water tank on the bank there needs to be a visit from the pigeons.   This block will form the background behind the existing station scene. 

Cheers
#5
Dioramas / Re: Two cities layout.
March 25, 2021, 10:43:37 AM
I haven't spent much time in the workshop lately but I have been working on a block of buildings which will sit behind the station next to the hotel.  Here is an in progress teaser photo.


The two smaller structures are Lunde Studios fronts with foam core bodies.   The bank on the right made from two Bachmann Savings and Loans.  The bank sign is stenciled directly on the wall with craft paint.

Cheers
#6
Dioramas / Re: Two cities layout.
February 02, 2021, 06:52:13 PM
Mark, I have a love-hate relationship with that cobblestone material.  It was marketed for military modelers.  It is flexible and I originally bought it for a scene that was going to be very hilly.  It looks good from some angles and not from others.    That street might be paved over in the future.  Who knows. 


I pulled out the shrubberies and planted them with a little path down the middle.  The purpose of the bushes was to mask the edge of the platform and cover those ugly wires that you might have spotted in prior photos.  There is a bit of debris in there too. 


Cheers.


#7
Dioramas / Re: Two cities layout.
February 01, 2021, 12:02:26 PM
I decided to paint the soil area.  I used a tan and two darker brown craft paints.  I thinned the paints into a wash and covered with the light color then dapped in areas of the darker colors, working back and forth with a single brush and allowed them to blend.   The results look more like soil with a history rather than a newly graded back yard. 


The car stop is from Tichy. I gave it a coat of red then came back with some rust.  I also rusted the rails with the same paint.  Once the paint has had time to set I'll give it wash of ink.  I noticed that one spot in the front looked like a protruding rock so I dry brushed it with some gray to make it look weathered and sun faded.


Foliage is next.  I did a bit more work along the sidewalk and street while the dirt paint dried.  Some weeds were used to dress the uneven sidewalk joints as well as some gaps between the sidewalk and street material.


I used a darker brown paint to make the corner against the wall look like washed out soil and added weeds to it.  I also added a thin wash of darker brown to the cracks in the driveway, particularly where it is more broken up to simulate dirt accumulating. 


Cheers


#8
Dioramas / Re: Two cities layout.
January 31, 2021, 01:17:17 AM
I've got a question about soil color in the Boston area.  Specifically, what color does it tend to be?

I used Polyblend Sanded Grout in "haystack" as a soil covering over the play sand I used to rough in this area (as seen in the photo above).  This color is very close to the color of my weathered concrete.   Should I go a shade lighter or darker or does the Boston area soil tend to a totally different shade?   I don't have access to real dirt as around here the soil is black/gray "gumbo" clay covered by whatever soil came with the grass mats when they sodded the yards.

That pale strip behind the car stop is the unweathered steps with a base coat of concrete.  It really washed out in the photo.


Thanks for the dirt tips,

Cheers
#9
Dioramas / Re: Two cities layout.
January 28, 2021, 12:01:18 PM
Air dry clay, a bit of strip wood for forming, a knife for trimming and a little finesse and we have a set of concrete steps leading to a cliff.   Once the clay dries it will be painted to match the other concrete in the area.


I also need some large shrubberies to mask an ugly bit of wiring next to the raised platform.   Theses are lichen dipped in thinned white glue and covered in a fine grass blend.


More later,

Cheers
#10
Dioramas / Re: Two cities layout.
January 27, 2021, 03:39:05 PM
Thanks.   

The sidewalks came from Magnuson kits.  The retaining walls and tunnel are cast from my own hand made masters. 
#11
Dioramas / Re: Two cities layout.
January 26, 2021, 11:20:43 PM
I've been doing a bit of scenery work in and around some finish work on the express warehouse.  Here is a brief update.

I ballasted this section of track (after adding feeders) using a modification of George's formula.  According to an interview video I found he used lamp black and a rust color thinned with spirits.  I've tried to replicate the look using water based paints.  I used oxide black between the rails and iron oxide along the outside of the rails, both thinned to make a wash.  I'm not sure if the black might need to be a bit darker but I stopped when ballast started to come loose.  The loading dock is the trackside dock for the express building.


I've also added fences, vines, signs, and shrubberies along the sidewalk and walls.  There is a bit more I want to do here before I add streetlights.


I hunted for quite some time before I found the exact circus clown sign and "Shell" sign that George used on the original.  Some of the other signs follow the original and others are different. 


Next I need to plant the express building and work on the scenery surrounding it.

Cheers.

#12
Dioramas / Re: Two cities layout.
January 05, 2021, 03:01:56 PM
How much paint do you need to add to the mix?  I'll have to try that.

I've applied a wash of ink per George's formula.   I think it is going to be ok.   


There will be more weathering, likely with pastels.  I also touched up the cobblestone road where plaster ran into it.   It still needs highlights.


Cheers
#13
Dioramas / Re: Two cities layout.
January 05, 2021, 01:59:21 PM
I think the issue is the water based paint just doesn't penetrate like oil based did.   Maybe I didn't thin it enough.   Coloring the plaster would make sense but I don't have anything on hand to do so.   I'm not sure what's best for that.   

So instead of breaking everything out I went into my supplies and found a bottle of oil based rust stain.   


I applied this along the rails to cover the white plaster.   I didn't bother being neat as more "mess" is to come. 


It smells more like the oil soaked concrete of a warehouse lot now.   Fingers crossed.

Cheers.
#14
Dioramas / Re: Two cities layout.
January 05, 2021, 12:54:52 PM
I am not happy with water based paint today.   I always did my street work with Floquil paints.  But that ship has sailed.  I've had good luck with the water based craft paints and artist acrylics on wood and plaster is porous like wood so it should be fine right?

I chose a craft color for a base coat and applied it to the parking lot.


I allowed it to dry then proceeded to clean the rail heads.   That's where the disaster began.  The paint started pulling up along the edges of the rail like a plastic sheet.  So stopped and ran a razor blade along the edges of the rail to cut this film.   Even that didn't solve the problem.  I've got paint pulling up on the cut where the blade ran.  I've got paint pulling up when I clean the inside of the rails.  This is a mess that I never experienced using spirits based Floquil. 


At this point I don't know if I want to continue forward or just rip the whole thing out and start over.   My intention was to weather the surface with artists pastels but now that I have bare plaster again I'm not sure how to proceed.

I used craft paint but I did thin it.   

Very frustrated.

#15
Dioramas / Re: Two cities layout.
January 02, 2021, 01:26:48 PM
I finally got around to laying track in this area and so I decided to pave the area in front of the express warehouse.

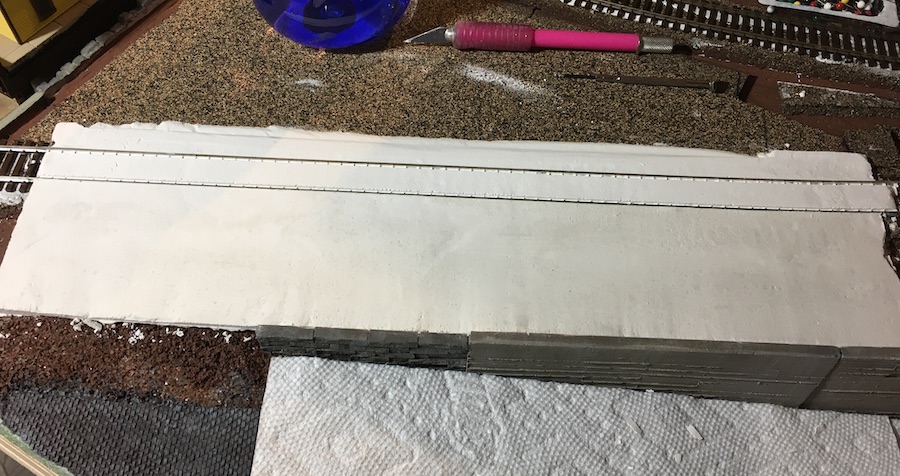
I wrapped the building in cling wrap to prevent plaster from getting on it and pinned some stops to the foam to keep the building in position.


I also pinned down some stripwood forms and then filled the area with plaster of Paris.  I normally use hydrocal but in this instance I wanted the softer plaster of Paris for the next step.


I used a short straight edge to carve down the plaster so that it was level with the rails and slightly below the stones at the front.  I also created a slope at the left to help blend this area into the road.


Next I carved the flange ways.  This is where I need the softer plaster.  I use a small screwdriver with a head width equal to the flange way.  These drivers normally come in sets for doing small machine work.  The heads are cut square and not rounded so they make a good scraping tool.  I hold the head flat and against the inside of the rail and carefully draw it down the length of the plaster.


I use very light pressure so that I remove only a small bit of plaster on each pass.  I continue making passes until the track spikes appear.  At this point the flange ways are deep enough to allow cars to roll smoothly.


I test the flange ways by rolling a few cars into the track.  If you try this be sure the uncoupling pins are set correctly or you will gouge the soft plaster between the rails.


I then used a scribe to carve expansion joints onto the pavement.  In this case 18' by 10' gave me the look I wanted.


Next I carved cracks into the pavement.   This area will see heavy trucks and movement caused by freight cars so I chose to add a lot of cracking.


Here is a gratuitous close up of the cracked pavement.  I went back and added joints and cracks to the section between the rails after I took this photo.


I want to add the ramp from the parking area to the road before I paint it but I'm still not sure I like the road.  I'm considering pulling it up and repaving it.


Cheers!

Powered by EzPortal