- Welcome to The Modeler's Forum.

TMF


Recent posts
#1
The O-Narrow Line / Re: Geezer's Lounge (Rev 1) - ...
Last post by Rick - Today at 06:21:24 AMA very quick good morning to all this morning.
I just got here to the Great Sand Dunes NP.
Going to try and get some pictures at sunrise but there aren't any clouds so don't know how that will turn out.
Sunny and low 80's here at the park today.
I'll do some hikes later today here at the park and I think Star and come too on some of them.
Have a great day everyone.
#2
Kit Building / Re: Horwood Brothers Gas, Oil ...
Last post by Rick - Today at 06:16:22 AMTom, I knew you wouldn't leave them the way they were.
Great fix and they do look better.
Great fix and they do look better.
#3
Kit Building / Re: Horwood Brothers Gas, Oil ...
Last post by Mark Dalrymple - Today at 12:25:59 AMI must know you well, Tom.
I read you're earlier entry over breakfast and thought "I won't comment yet. Tom will have to fix this first". Nice fix as always. Great to see this thread moving along and you making hay while the sun shines. I'm looking forward to see the sign lit up, as well.
Cheers, Mark.
I read you're earlier entry over breakfast and thought "I won't comment yet. Tom will have to fix this first". Nice fix as always. Great to see this thread moving along and you making hay while the sun shines. I'm looking forward to see the sign lit up, as well.
Cheers, Mark.
#4
The O-Narrow Line / Re: Geezer's Lounge (Rev 1) - ...
Last post by jbvb - July 18, 2026, 09:13:27 PMGood evening, all. I drove up to Conway NH this morning for a Flying Yankee work day. Sunny and warming from 60s to high 70s, but then clouds came in. Rain started about 2 PM and it rained on me all the way home. We pretty much filled the dumpster with stuff from our containers that had been put there during the shut-down clean up when contractor work last stopped almost 20 years ago.
I stopped in at the Heritage Park & Railroad Museum in Union NH on my way home. I had a good conversation with RIch B., who was staffing it with a friend. He's an experienced modeler who's done a lot of work on their layout. Dave contributed a bunch of boxcars to their fleet a few years back, but that may have been documented on RR-Line.
I stopped in at the Heritage Park & Railroad Museum in Union NH on my way home. I had a good conversation with RIch B., who was staffing it with a friend. He's an experienced modeler who's done a lot of work on their layout. Dave contributed a bunch of boxcars to their fleet a few years back, but that may have been documented on RR-Line.
#5
The O-Narrow Line / Re: IMMR & T Co.
Last post by Michael Hohn - July 18, 2026, 07:59:44 PMThey look good.
#6
The HO / HOn3 / HOn30 Line / Re: HOn3 Parlor Car for the B&...
Last post by ReadingBob - July 18, 2026, 07:21:32 PMOh man! That looks great. We'll done.
#7
The HO / HOn3 / HOn30 Line / HOn3 Parlor Car for the B&SGE
Last post by VagelK - July 18, 2026, 06:54:56 PMSometimes adding to a model railroad's rolling stock roster isn't so much a model-building task but only a matter of purchasing a brass piece, then painting and decalling it (if it isn't already factory-painted for a prototype). This was the case with the presidential parlor/business car for my Blacklog & Shade Gap Eastern. An EBay score several years ago brought a NWSL Ohio River & Western parlor car - painted an appropriate shade of green and lightly weathered - to the roster, where it languished in unlettered and unnamed limbo until now. This is the car ready finally ready to go into service:

Clerestory window frames were filled with Evergreen .010 x .060" strip styrene affixed with superglue.
I over-sprayed the car with Tamiya Clear Coat to provide a smooth surface for lettering and numbers. The road name is from one of 50 original sheets I had printed by Rail Graphics in the mid-1990s; they are in surprisingly good condition, with the clear film not brittle. I have lettered this car and a combine (SEE "HOn3 Combine - EBT Prototype" in this same sub-forum) and had only one tear. The car numbers came from an equally old sheet of EBT freight car decals from the Friends of the EBT Co. Store.
A railroad's business car has to have a name, and I chose "Hadessa," for my maternal grandmother, without whom I might never have discovered narrow-gauge railroads in general, and the EBT in particular, as a child. Gramma Locke, known throughout lower Huntingdon County as "Dessie," rode the EBT on her journey to wed Pappy Locke back in 1912 and had a feeling of nostalgia for it, so when she learned that the EBT was going to reopen for rides during that fateful Homecoming Week in August 1960, she asked Mom and Dad to drive her over the mountain to "ride it one last time before they rip it up." Sic Transit Gloria Mundi.
That long-winded preamble leads to this: the sign is printed on regular white paper glued to a 3x5 card backing, trimned to size and glued to the car side with Aileen's.
After decals and signs were applied and over-sprayed with Testors Dull Coat, I added .005" clear styrene, affixed to the interior with Micro Krystal Klear, to represent window glazing. A final touch was to paint the rear railing brass.

Now, at long last, the B&SGE can finally keep up with the Jones's next door.
Clerestory window frames were filled with Evergreen .010 x .060" strip styrene affixed with superglue.
I over-sprayed the car with Tamiya Clear Coat to provide a smooth surface for lettering and numbers. The road name is from one of 50 original sheets I had printed by Rail Graphics in the mid-1990s; they are in surprisingly good condition, with the clear film not brittle. I have lettered this car and a combine (SEE "HOn3 Combine - EBT Prototype" in this same sub-forum) and had only one tear. The car numbers came from an equally old sheet of EBT freight car decals from the Friends of the EBT Co. Store.
A railroad's business car has to have a name, and I chose "Hadessa," for my maternal grandmother, without whom I might never have discovered narrow-gauge railroads in general, and the EBT in particular, as a child. Gramma Locke, known throughout lower Huntingdon County as "Dessie," rode the EBT on her journey to wed Pappy Locke back in 1912 and had a feeling of nostalgia for it, so when she learned that the EBT was going to reopen for rides during that fateful Homecoming Week in August 1960, she asked Mom and Dad to drive her over the mountain to "ride it one last time before they rip it up." Sic Transit Gloria Mundi.
That long-winded preamble leads to this: the sign is printed on regular white paper glued to a 3x5 card backing, trimned to size and glued to the car side with Aileen's.
After decals and signs were applied and over-sprayed with Testors Dull Coat, I added .005" clear styrene, affixed to the interior with Micro Krystal Klear, to represent window glazing. A final touch was to paint the rear railing brass.
Now, at long last, the B&SGE can finally keep up with the Jones's next door.
#8
Kit Building / Re: Horwood Brothers Gas, Oil ...
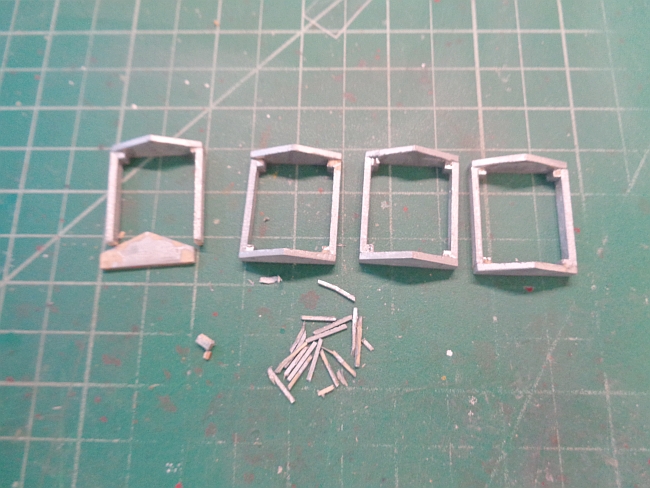
Last post by ACL1504 - July 18, 2026, 06:06:38 PMThe four end gables were glued in place and set aside to dry. When dry, I touched up the sanded area with the silver paint.
The glass frame is on the skylight but not centered. I kept sliding around. I'll glue it in place once the glass is added.
I forgot to mention that I also shortened the acetate glass panels as well.
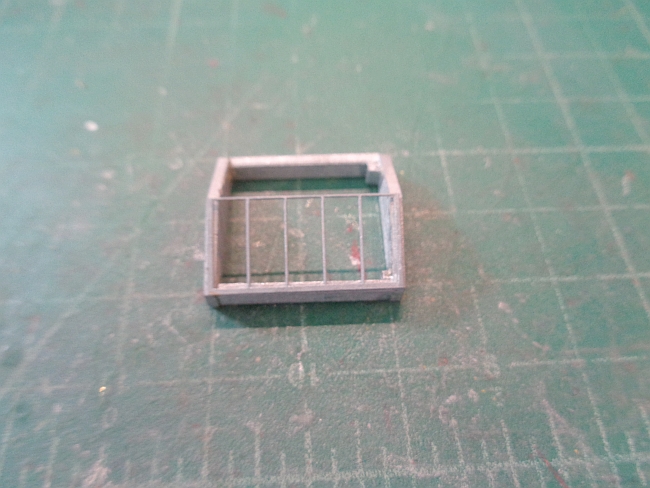
This is much better and now looks correct. I did tack them in place to keep them from sliding off.

Done for today.
The glass frame is on the skylight but not centered. I kept sliding around. I'll glue it in place once the glass is added.
I forgot to mention that I also shortened the acetate glass panels as well.
This is much better and now looks correct. I did tack them in place to keep them from sliding off.
Done for today.
#9
Kit Building / Re: Horwood Brothers Gas, Oil ...
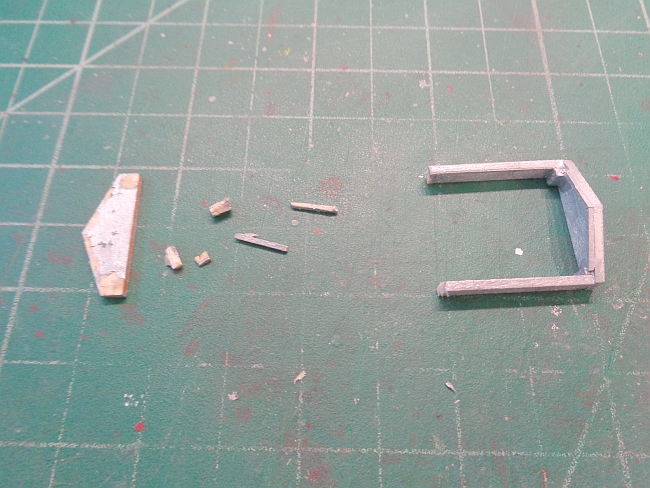
Last post by ACL1504 - July 18, 2026, 06:01:58 PMI then removed one end of the gables from the other three. The old glue was sanded from all the gables.
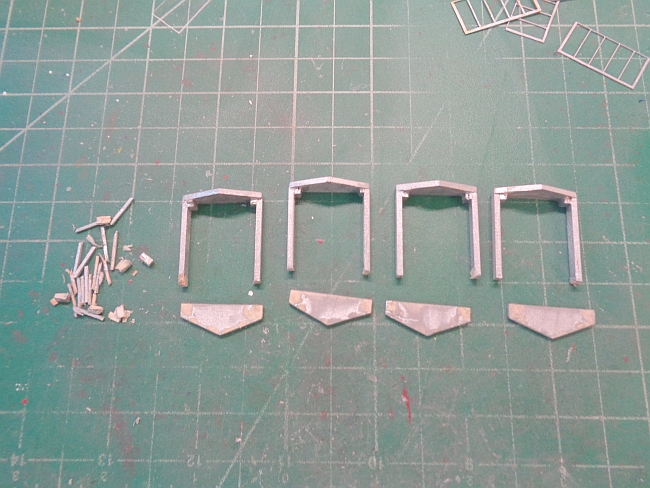
I measured, thrice, and cut 1/16' off each of the eight side rails.

I measured, thrice, and cut 1/16' off each of the eight side rails.
#10
Kit Building / Re: Horwood Brothers Gas, Oil ...
Last post by ACL1504 - July 18, 2026, 05:57:18 PMSince I'm shortened the width, it wasn't necessary to keep the 2X2 glued to the gable angles.
I then cut off the remaining 2X2s from all the skylights.
I then cut off the remaining 2X2s from all the skylights.
Powered by EzPortal